https://react.dev/learn/tutorial-tic-tac-toe#setup-for-the-tutorial
Tutorial: Tic-Tac-Toe – React
The library for web and native user interfaces
react.dev
한글로 번역해서 보면 코드 네임과 문장이 뒤죽박죽 섞여 웬만하면 영어로 보는 것이 좋은 것 같다.
나는 영어로 보되, 모르는 단어가 있으면 그때 그때 찾아가면서 이해하고 넘어갔다.
이번에 만들어 본 것은 리액트 공식 사이트에서 tutorial로 만들어진 tic-tac-toe 게임 프로젝트이다.
Code SandBox로도 실습이 가능하지만, 나는 GitHub에 학습 내용을 올리기 위해 VS Code를 이용해 실습했다.
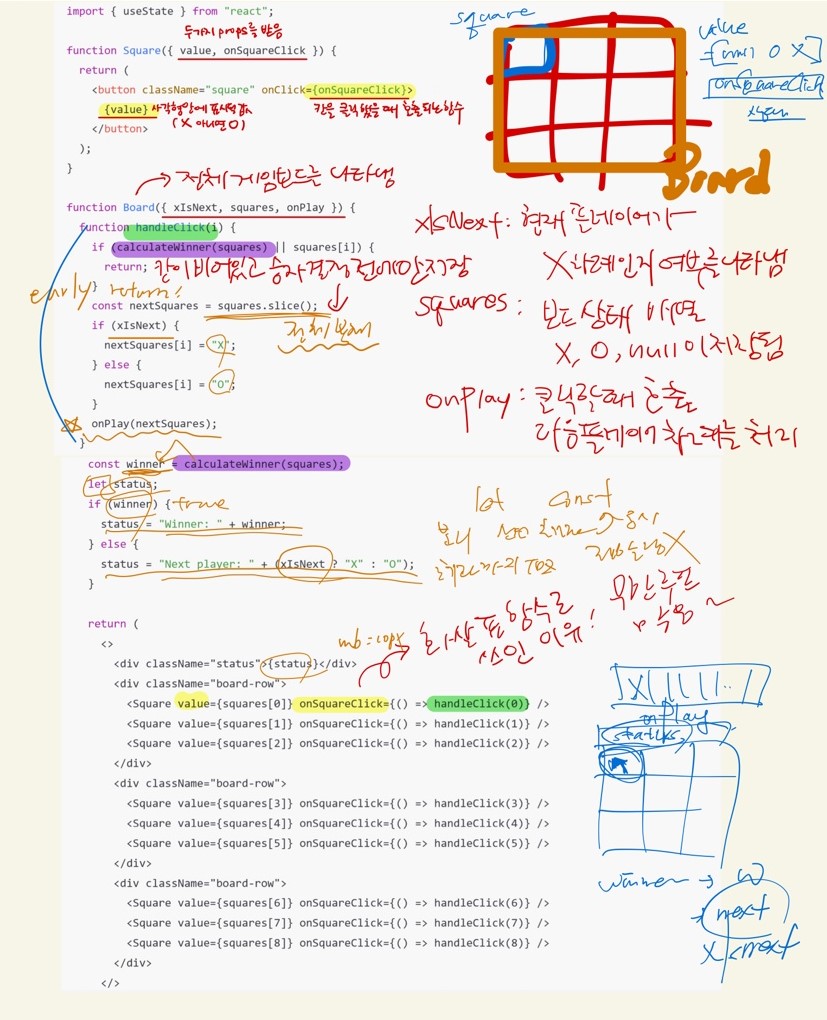
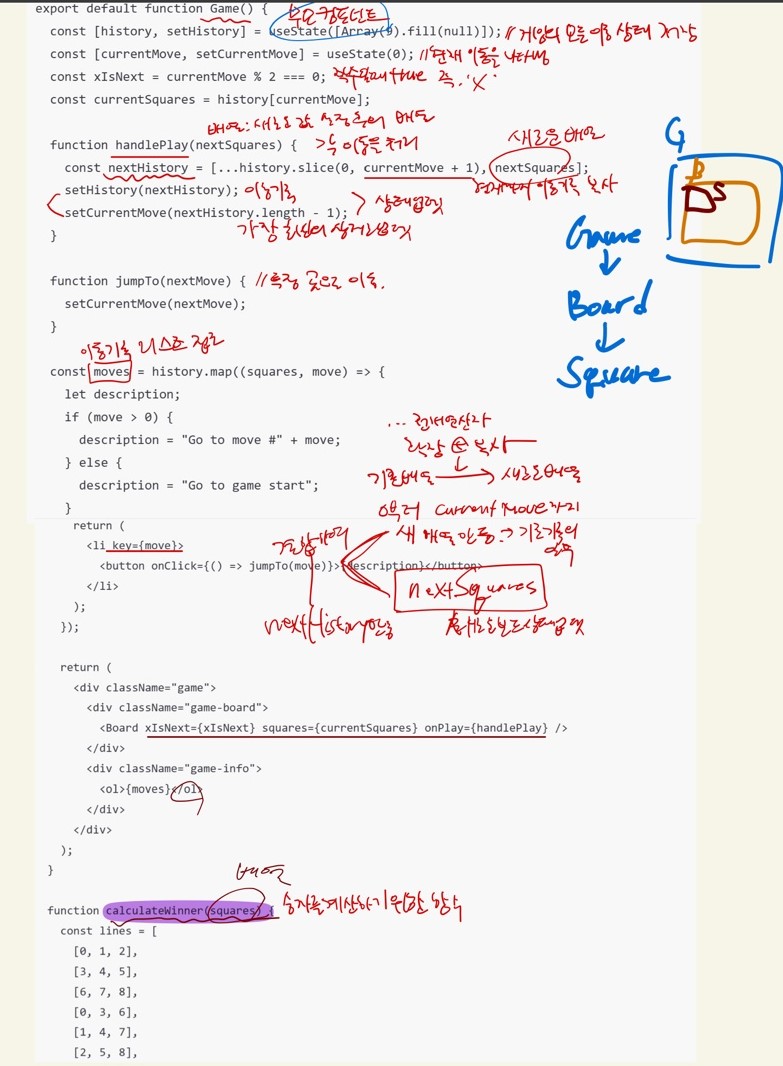
어려운 부분들은 따로 아이패드로 코드 한 줄 한 줄 해석해보면서 필기했다,,,
복잡복잡했던 상태를 표현해주는 필기들ㅋㅋㅋㅋㅋㅋㅋㅋㅋㅋ;;
문서를 따라하면서 만들어보고, 추가 기능까지 덧붙여서 게임을 완성시켰다.
추가 기능
- 같은 문자로("O" or "X") 한 줄 완성된 칸(winnerLine)들에 스타일 지정하기
- "게임 시작" 문구 화면에 출력 / winner가 정해지지 않았을 때, "무승부" 문구 화면에 출력(status)
- Square 컴포넌트의 중복 없애기(map 사용)
import { useState } from "react";

function Square({ value, onSquareClick, isWinningSquare }) {
  const squareClassName = isWinningSquare ? "winning square" : "square";

  return (
    <button className={squareClassName} onClick={onSquareClick}>
      {value}
    </button>
  );
}

function Board({ xIsNext, squares, onPlay }) {
  function handleClick(i) {
    if (calculateWinner(squares) || squares[i]) {
      return;
    }
    const nextSquares = squares.slice();
    if (xIsNext) {
      nextSquares[i] = "X";
    } else {
      nextSquares[i] = "O";
    }
    onPlay(nextSquares);
  }

  const winnerLine = calculateWinner(squares);
  let status;

  if (winnerLine) {
    const winner = squares[winnerLine[0]];
    status = "Winner: " + winner + " 👏😀👏";
  } else if (squares.every((item) => item === null)) {
    status = "Game Start 👉";
  } else if (squares.every((item) => item !== null) && winnerLine === null) {
    status = "Draw!😗";
  } else {
    status = "Next player: " + (xIsNext ? "X" : "O");
  }

  const boardRows = Array.from({ length: 3 }, (_, row) => (
    <div key={row} className="board-row">
      {squares.slice(row * 3, row * 3 + 3).map((square, col) => {
        const index = row * 3 + col;
        return (
          <Square
            key={index}
            value={square}
            onSquareClick={() => handleClick(index)}
            isWinningSquare={winnerLine && winnerLine.includes(index)}
          />
        );
      })}
    </div>
  ));

  return (
    <>
      <div className="status">{status}</div>
      {boardRows}
    </>
  );
}

export default function Game() {
  const [history, setHistory] = useState([Array(9).fill(null)]);
  const [currentMove, setCurrentMove] = useState(0);
  const xIsNext = currentMove % 2 === 0;
  const currentSquares = history[currentMove];

  function handlePlay(nextSquares) {
    const nextHistory = [...history.slice(0, currentMove + 1), nextSquares];
    setHistory(nextHistory);
    setCurrentMove(nextHistory.length - 1);
  }

  function jumpTo(nextMove) {
    setCurrentMove(nextMove);
  }

  const moves = history.map((squares, move) => {
    let description;
    if (move > 0) {
      description = "Go to move #" + move;
    } else {
      description = "Go to game start";
    }
    return (
      <li key={move}>
        <button onClick={() => jumpTo(move)}>{description}</button>
      </li>
    );
  });

  return (
    <div className="game">
      <div className="game-board">
        <Board xIsNext={xIsNext} squares={currentSquares} onPlay={handlePlay} />
      </div>
      <div className="game-info">
        <ol>{moves}</ol>
      </div>
    </div>
  );
}

function calculateWinner(squares) {
  const lines = [
    [0, 1, 2],
    [3, 4, 5],
    [6, 7, 8],
    [0, 3, 6],
    [1, 4, 7],
    [2, 5, 8],
    [0, 4, 8],
    [2, 4, 6],
  ];
  for (let i = 0; i < lines.length; i++) {
    const [a, b, c] = lines[i];
    if (squares[a] && squares[a] === squares[b] && squares[a] === squares[c]) {
      return [a, b, c];
    }
  }
  return null;
}
* {
box-sizing: border-box;
}
body {
font-family: sans-serif;
margin: 0 auto;
display: flex;
justify-content: center;
align-items: center;
}
.square {
background: #fff;
border: 1px solid #999;
float: left;
font-size: 24px;
font-weight: bold;
line-height: 50px;
height: 50px;
margin-right: -1px;
margin-top: -1px;
padding: 0;
text-align: center;
width: 50px;
}
.board-row:after {
clear: both;
content: '';
display: table;
}
.status {
margin-bottom: 10px;
font-weight: bold;
color: blue;
font-size: 1.1rem;
}
.game {
display: flex;
flex-direction: row;
margin-top: 30px;
}
.game-info {
margin-left: 20px;
}
.winning {
background-color: red;
}
프로젝트를 통해 알게 된 것
CSS
- float 후에는 clear: both로 해제를 시켜줘야 정상적으로 작동한다.
React
- props와 hook을 적절히 사용하는 방법을 알았다.
- 코드의 재사용성을 항상 고려해야 한다.
git init

# 로컬의 브랜치 변경 master -> main
git branch main
git checkout main
git branch -D master

git add .

git commit -m "commit message"

git remote add origin "깃허브 레포지토리 링크"

git push origin main[Git] fatal: refusing to merge unrelated histories 해결 방법
로컬 저장소의 프로젝트를 GitHub에서 만든 원격 저장소에 Push를 하려고 할 때 $ git push origin main To github.com:somjang/test-repo.git ! [rejected] main -> main (non-fast-forward) error: failed to push some refs to 'github.com:42m
somjang.tistory.com
소스 트리로만 깃허브에 파일을 올리다가 터미널로 하려니 헷갈리는 것이 많았다.
요즘은 검색 좀만 하면 해결 방법이 나오니 참고해서 금방 해결했다.
https://github.com/zoneiiiii/practice_react
GitHub - zoneiiiii/practice_react: 리액트 학습을 위한 레포지토리 입니다 :)
리액트 학습을 위한 레포지토리 입니다 :). Contribute to zoneiiiii/practice_react development by creating an account on GitHub.
github.com
깃 레포에 올리기 썽공적!! :)
'개발로그 > React' 카테고리의 다른 글
| 소플의 처음 만나는 리액트_실습final (0) | 2023.08.04 |
|---|---|
| 소플의 처음 만난 리액트_실습13 (0) | 2023.08.03 |
| 소플의 처음 만난 리액트_실습12 (0) | 2023.08.03 |
| 소플의 처음 만난 리액트_실습11 (0) | 2023.08.02 |
| 소플의 처음 만난 리액트_실습10 (0) | 2023.08.02 |


댓글